Lifecycle "Hooks" in Angular with examples- A Beginners Guide
Lifecycle Hooks


Table of contents
Introduction
In Angular lifecycle is associated with the angular components, when an angular application loads the component view is rendered, and the lifecycle of that component begins an instance of the class is created and renders the component view alongside its children.
The lifecycle continues as angular listens for lifecycle events and responds to changes until it is destroyed. Lifecycle hooks are predefined functions in angular that allow you to tap into custom code from the angular core, at a specific lifecycle of a component.
Prerequisite
Installation
Set up a local development environment for practicing the lifecycle hooks, you can use stack blitz or any other online editor if you want.
Install the angular CLI on your local machine.
npm install -g @angular/cli
Create a new angular application.
ng new angular-lifecycle
Create some components to exercise with.
cd angular-lifecycle
ng generate component lifecycle
ng generate component on-changes
ng generate component on-changes-child
Generate a service inside the lifecycle component folder.
ng generate service lifecycle
Your code base should look like this:
Angular Lifecycle Hooks
The Angular lifecycle hooks are explained below with mini exercises to help you understand the concept better, note that it is not necessary to implement all lifecycle hooks on one component but they should be used as required.
OnInit: The “ngOnInit” is a lifecycle hook that checks for data bound properties immediately a component is initialized. It mounts the initial state of properties in the component.
The “ngOinit” executes just once through out a component lifecycle, it initializes a method or task that will be used in the component or directive. Since the view is not yet rendered when the “ngOnInit” function runs, it is not advised that it be used to change the components view.
Practice this on the generated lifecycle component.
import { Injectable } from '@angular/core';

@Injectable({
  providedIn: 'root'
})
export class LifecycleService {

  constructor() { }

  message:string = "this is onInit";

}
The above code declares a message property in the lifecycle service component.
import { Component, OnInit } from '@angular/core';
import { LifecycleService } from './lifecycle.service';
@Component({
  selector: 'app-lifecycle',
  templateUrl: './lifecycle.component.html',
  styleUrls: ['./lifecycle.component.scss']
})
export class LifecycleComponent implements OnInit {
  message!:string;
  constructor(private service: LifecycleService,) { }
ngOnInit(): void {
    this.message! = this.service.message
    console.log(this.message)
  }
}
The above code receives the message property from the lifecycle service file, it is stored in a string variable “message: string” and logged to the console. Once the component renders the message property is logged. The message is then displayed on the template.
<p>lifecycle works!</p>
<p>{{ message }}</p>
Clear your app.component.html leaving only the <route-outlet> and next the “lifecycle” component.

run your application.
ng serve
Open your browser and inspect the webpage you will see the message property logged to the console.

Onchanges: This hook monitors changes made to components with data-bound input fields and reacts to them. The “ngOnchanges” tracks changes as data is entered into the input.
As changes are detected, this hook updates the object’s current and previous property values. It is a change detection hook, it runs once before the “ngOnInit” on a component with a data-bound input and is activated each time a change is detected.
To practice this method, we’ll use a straightforward course list application.
import { Component, } from '@angular/core';
@Component({
  selector: 'app-on-changes',
  templateUrl: './on-changes.component.html',
  styleUrls: ['./on-changes.component.scss']
})

export class OnChangesComponent {

   course = '';

   title = 'Onchange test string';

   constructor() { }

   changeMessage(){
    this.title = 'Title Changed';
    console.log('clicked');
   }

   onNameChange($event: string){
        this.course = 'Python';
   }
}
The above code should be written in the component.ts file, the next is the template (HTML) file.
<h2>onChanges parent</h2>
<p> {{ title }} </p>
    <label for="course-name">Course name: </label>
    <input type="text" id="course-name" [(ngModel)]="course"  #courseName/> <br>
<br><br>

<button (click)="changeMessage()">Change message</button>
<app-onchanges-child (messageEvent)="onNameChange($event)"
  [course]="course" [title]="title">
</app-onchanges-child>
The above code has the “onchanges-child” component nested into it, making it a child component, add the child component’s code.
import { Component, OnInit, Input,
  OnChanges, SimpleChanges, EventEmitter, Output } from '@angular/core';

@Component({
  selector: 'app-onchanges-child',
  templateUrl: './onchanges-child.component.html',
  styleUrls: ['./onchanges-child.component.scss']
})
export class OnchangesChildComponent implements OnInit , OnChanges {

  @Input() title!: string;
  @Input() course!: string;

  @Output() messageEvent = new EventEmitter<string>();
  @Output() event:string = '';

  constructor() { }

  ngOnInit(): void {
  }

  ngOnChanges(element: SimpleChanges){
    console.log('Input property changed: ', this.title);
    console.log('ngonchanges called'),
    console.log(element)
  }

  onChangeCourse(){
    this.messageEvent.emit(this.event)
  }

}
Add the corresponding template (HTML) file.
<h2>onchanges-child</h2>
<P>{{ title }} </P>
<h3>Course List</h3>
<button (click)="onChangeCourse()">change course</button>
Update your app.component.html clearing out the lifecycle component, like this:

Run your application and inspect.
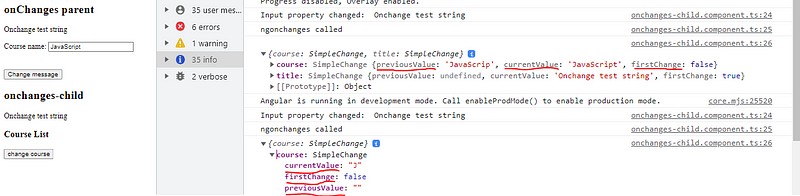
As shown in the out put above, The code implements the “ngOnchanges” hook on the “onChanges-child” component, the child component has a data bound input and a property, a title property that was first declared in the parent and shared to the child and a button that has a click event to change the message property for both parent and child component.
The child component shares an event with the parent component, a function that changes the course name on the input field. Try it out, inspect your console all changes made to the input field are recorded as they occur. The input has an object that contains the current value, previous value and also indicate if the input field has been touched or not.
Docheck: The “ngDocheck” is a lifecycle hook that checks for changes that angular cannot detect on it’s own. As the “on change hook” checks for input data properties it does not detect changes to data bound properties that are not input bound.
The “Docheck hook” checks for non input bound properties changes manually, it detects the change and records it each time a change is made.
Generate a new component to practice the “Docheck hook”.
ng generate component Docheck
Add the following code to the template file.
<h1>Docheck</h1>

<h6>Increment:{{number}}</h6>

<button (click)="addNumber()">+</button>
Add the below code to your component.ts
import { Component, OnInit, DoCheck } from '@angular/core';

@Component({
  selector: 'app-docheck',
  templateUrl: './docheck.component.html',
  styleUrls: ['./docheck.component.scss']
})
export class DocheckComponent implements OnInit, DoCheck {

  number = 0;

  constructor() { }

  ngOnInit(): void {

  }
  ngDoCheck(): void {
    console.log(this.number)
  }

  addNumber(){
    this.number++
  }

}
Run your application and update the app.component.html as usual, try it out. The Do-check detects and records the value changes on the console and update the value as the clicks are made. The button has already been clicked four times on the image below:
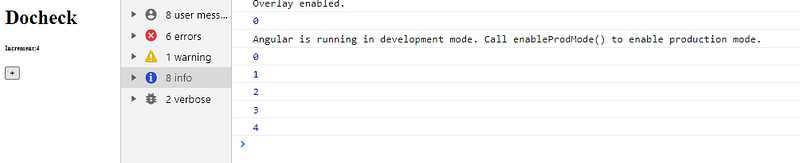
As the value increases per click, the “Docheck” is called each time achange is detected, the view is updated with a plus one value.
AfterContentInit: This hook is related to content projection; content projection is simply viewing the content of a component through another component. Angular projects a component’s properties into its the parent component it is nested to.
The “ngAfterContentInit” runs as a component is initialized and checks for properties of a projected component. this lifecycle hook runs only once after the projected components are done loading.
Generate two new component’s to practice:
ng generate component AfterContent-init
ng generate component AfterContentChecked
The first generated component will be used as a parent component to project the others component properties.
Firstly type the code into the afterContentChecked component template file.
<ul>
    <li>JavaScript</li>
    <li>Python</li>
    <li>Java</li>
</ul>

<ng-content></ng-content>
The properties below will be projected into the parent component. type the next code into the “AfterContent-Init” template file.
<h2>after-content-init works!</h2>

<app-after-content-checked>
    <h3>List of Courses from child</h3>
</app-after-content-checked>

<hr>

<app-after-content-checked>
    <h3>List of Courses from child</h3>
</app-after-content-checked>
Now nest it into your app.component.html to view your code. Look closely the child component was nested twice and demarcated with an <hr> on purpose.
To check the projected content implement the “ngAfterContentint” hook on to the child component.
import { AfterContentInit, Component, OnInit, } from '@angular/core';

@Component({
  selector: 'app-after-content-checked',
  templateUrl: './after-content-checked.component.html',
  styleUrls: ['./after-content-checked.component.scss']
})
export class AfterContentCheckedComponent implements OnInit, AfterContentInit {

  constructor() { }

  ngOnInit(): void {
  }

  ngAfterContentInit(): void {
    console.log('content init')
 }


}
At this point you should know what todo; Check your application inspect the console and you will see the “content init” message logged to the console twice which is indicated with a number 2 as seen below.
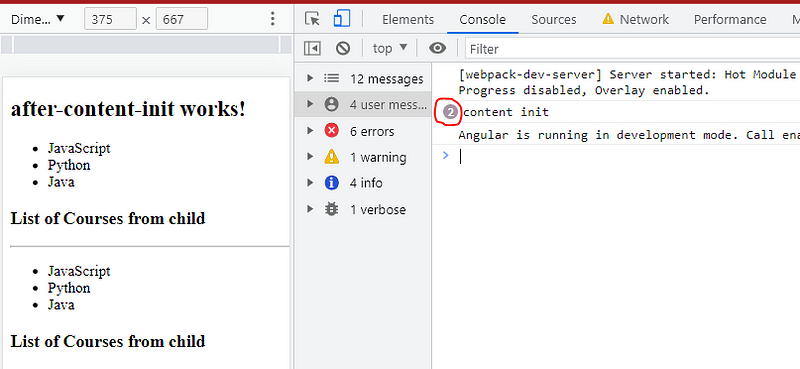
The content was projected twice to make sure the hook is working, if you want to test this, duplicate the template file from the parent component to make the third projection. The content init message will be increased to three on the console.
AfterContentChecked: The “ngAfterContentChecked” Checks for property changes on a projected component after the content has been checked .
It serves as a change detection hook, therefore instead of using the “ngOnchanges” or “ngDocheck” for change detection on a property that was projected from another component it is preferred to use the “ngAfter ContentCheck”.
The “ngAfterContentChecked” runs each time a change is been carried out on the projected component.
Update the “AfterContentChecked” component with the following code:
import { AfterContentInit, AfterContentChecked, Component, OnInit, Input, EventEmitter, Output} from '@angular/core';

@Component({
  selector: 'app-after-content-checked',
  templateUrl: './after-content-checked.component.html',
  styleUrls: ['./after-content-checked.component.scss']
})
export class AfterContentCheckedComponent implements OnInit, AfterContentInit, AfterContentChecked {

  total:number = 0;

  constructor() { }

  ngOnInit(): void {
  }

  ngAfterContentInit(): void {
    console.log('content init')
 }

 ngAfterContentChecked(): void {
   console.log('content checked',this.total)
 }

 addCourse(){
  this.total++
 }

}
The “AfterContentChecked” component implement a simple increment function and the “ngAfterContentChecked” hook, the increment value has been console logged inside the hook as usual to help monitor the changes.
Update the template file.
<ul>
    <li>JavaScript</li>
    <li>Python</li>
    <li>Java</li>
</ul>

<p>total courses:{{ total }}</p>
<button (click)="addCourse()">+</button>


<ng-content></ng-content>
Your application should still be running, click the button to increase the total courses, you should get a feedback on the console. The hook observes every single change.
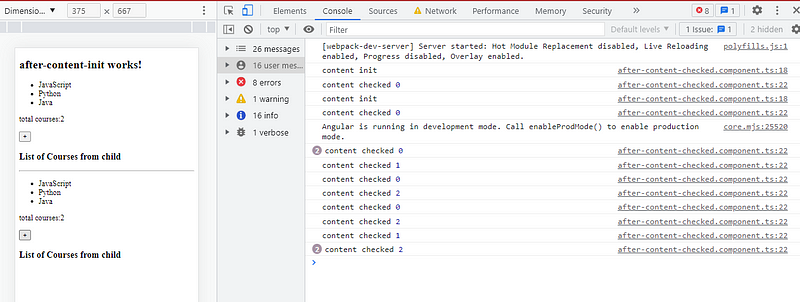
The change is recorded as much as you click the buttons, this will be the same for a projected component that has a data bound input field. you can add an input field to see how the changes will be observed.
AfterViewInit: The “ngAfterContentInit” is a lifecycle hook that runs after all the properties on a component has completely loaded. this hook is used to check for initialized property once a component’s view is initialized.
See the example below: generate two new components name them “afterviewinit” and “afterviewchecked”, Add the code below to the afterviewinit template and component.ts file respectively.
<p>afterview-init works!</p>

<div #div>After view Init div </div>
import { Component, OnInit, AfterViewInit, ViewChild } from '@angular/core';

@Component({
  selector: 'app-afterview-init',
  templateUrl: './afterview-init.component.html',
  styleUrls: ['./afterview-init.component.scss']
})
export class AfterviewInitComponent implements AfterViewInit {

  @ViewChild('div') div: any

  constructor() { }

  ngAfterViewInit(): void {
    console.log('view initalized'),
    console.log(this.div.nativeElement.textContent);
  }

}
Check the console for the message as usual.
The “AfterviewInit” lifecycle hook is a good place for one-time initialization tasks that require access to the view because it is only called once per component instance after the view has been completely initialized.
AfterViewChecked: The “ngAfterViewChecked” is an angular lifecycle hook that checks for properities changes of a component’s view child once the view is initialized.
The “ngAfterViewChecked” runs every time a change is made on a component’s viewChild’s property.
Here is an example:
<p>initial property: {{ initialProp }}</p>
<label for="course-name">Course name: </label>
<input type="text" id="course-name" [(ngModel)]="course"  #courseName/>
{{courseName.value}}
Type into the component.ts
import { Component, OnInit } from '@angular/core';

@Component({
  selector: 'app-afterviewchecked',
  templateUrl: './afterviewchecked.component.html',
  styleUrls: ['./afterviewchecked.component.scss']
})
export class AfterviewcheckedComponent implements OnInit {

  initialProp:string = 'Javascript';
  course = '';
  constructor() { }

  ngOnInit(): void {
  }
}
Next the “AfterviewChecked into the AfterViewInit. here we can implement the viewChild as the parent to child relationship will be created.
import { Component, OnInit, AfterViewInit, AfterViewChecked, ViewChild } from '@angular/core';
import { AfterviewcheckedComponent } from '../afterviewchecked/afterviewchecked.component';

@Component({
  selector: 'app-afterview-init',
  templateUrl: './afterview-init.component.html',
  styleUrls: ['./afterview-init.component.scss']
})
export class AfterviewInitComponent implements AfterViewInit, AfterViewChecked {

  @ViewChild(AfterviewcheckedComponent, { static:false }) courses! : AfterviewcheckedComponent;

  constructor() { }

  ngAfterViewChecked(): any {
    console.log(this.courses.initialProp);
    console.log(this.courses.course)
  }

  changeProp(){
   this.courses.initialProp = 'React.js'
  }
}
Add the following code to your component then we are good to go:
<h2>After Init  (Parent)</h2>
<hr>
<h2>After Checked (Child)</h2>
<app-afterviewchecked></app-afterviewchecked>
<button (click)="changeProp()">Change</button>
Inspect your console to see the changes as you input data and click the button of the child component data and see how it’s going to update.

ngOnDestroy: The “ngOnDestroy” is a lifecycle hook that is used to terminate a contract when a component is destroyed or removed from the DOM.
This helps avoid memory leaks: memory leaks is simply allocating a part of the memory to a process that is no longer needed or is done performing it’s function.
The “ngOnDestroy” runs every time a component is destroyed. This hook is usually used to unsubscribe from a service.
Here is an example using a simple directive, as usual generate a new component to practice this hook.
import { Component, OnInit, OnDestroy } from '@angular/core';
import { DataService } from '../on-destroy/data.service';

@Component({
  selector: 'app-home',
  templateUrl: './home.component.html',
  styleUrls: ['./home.component.scss']
})
export class HomeComponent implements OnInit, OnDestroy {

  message!:string;

  constructor( private data: DataService) { }

  ngOnInit(): void {
    this.message = this.data.message
    console.log(this.data.message)
  }

  ngOnDestroy(){
  this.message
  console.log('executing onDestroy',this.data.message)
  }

}
Update the template file.
<div>Data from Service: <p> {{ message }} </p></div>
Nest the child component on the parent component template file.
<h2>on-destroy works!</h2>

<app-home *ngIf="isShow"></app-home>
<button (click)="toggle()">toggle</button>
add the toggle function in the component.ts file:
import { Component, OnInit } from '@angular/core';

@Component({
  selector: 'app-on-destroy',
  templateUrl: './on-destroy.component.html',
  styleUrls: ['./on-destroy.component.scss']
})
export class OnDestroyComponent implements OnInit {

  isShow: boolean =  false;

  constructor() { }

  ngOnInit(): void {
  }

  toggle(){
    this.isShow = !this.isShow
  }

}
In the above code the child component declares a string variable “message” and imports a service, then taps from the service data message. when the toggle button is clicked the child component is visible and vise versa based on the “ngif” directives. The “ngOndestroy” hook cancels the subscription when the child component is not active.
Conclusion
Angular provides roughly 8 lifecycle hook methods and they are called up at a specific point of an angular component lifecycle. They are run in sequence and it is not required that all should be used in a single component, some lifecycle hooks should not even be used together in the same component, e.g the “Docheck” and “OnChanges”. As you keep on building and exploring the available lifecycle hooks you will be able to know which one you need at a specific point in your application.